A Tutorial for Yoga Teachers
Have you ever had a student come to your class, having recently had a total hip replacement, and tell you her doctor gave her no restrictions in movement whatsoever, encouraging her to do whatever she likes? It can and does happen — and you’re right if you’re suspicious as to whether the doctor is giving correct advice.
But are you prepared to help such people participate in your class safely? I hope in this article to help you do exactly that.
Anatomy of a hip replacement
First, I’d like to take you through some basic hip anatomy, and acquaint you with how the joint is actually replaced.
In recent years, there have been advances in the way total hip replacements are being done. A significantly different approach now coexists with the earlier approach, with the result that we yoga teachers need to know more about hip replacements than we used to need to know. In particular, we need to revise the precautions that we have been offering to yoga students who have undergone this orthopedic surgery.
The following illustration and explanation will help you understand what hip replacement is all about:
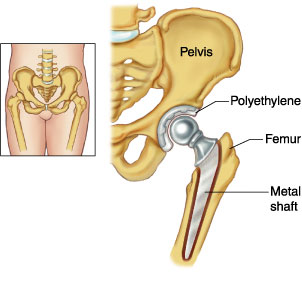 A total hip replacement (THR) is a surgical procedure whereby the diseased connective tissue (cartilage) and bone of the hip joint are surgically replaced with artificial materials. The hip joint is a ball and socket joint. The ball is the head of the thigh bone (femur). The socket (acetabulum) is a cup-shaped indentation in the pelvis.
During hip replacement surgery, the head of the femur is removed and replaced with a metal ball set on a stem. The stem is inserted into the canal of the femur. It may be fixed in place with cement, or the stem may be designed for placement without bone cement. The socket is sanded down to healthy bone, and a plastic cup or socket is held in place with screws and/or bone cement.
Illustration and explanation are ©Reed Group from www.mdguidelines.com/hip-replacement-total (January, 1999) (used with permission from Reed Group, 10155 Westmoor Dr. Suite 210, Westminster, CO 80021, 800-442-4519)
Details of the procedure
Want to get a look at how this procedure is done? Well, don’t get your own hip replaced unless you need to. Instead, go to the following website to try your hand at being a virtual surgeon by replacing a hip with the traditional “posterior” approach: www.edheads.org/activities/hip/ (January, 1999)
It is quite a fun and enlightening exercise. Don’t worry if you are squeamish; it is animated so there’s minimal blood and guts. The best thing is, nobody gets hurt even if you mess up!
In traditional hip replacement surgery, surgeons access the joint area through the upper thigh, either through the lateral (outside) part or the posterior (back) part. The incision — which usually begins at or near the buttocks and then follows the line of the hip down the leg — can be as long as 12 inches. During the surgery, the patient lies on the opposite side, and the surgeon must detach several major muscles from the pelvis or femur (thigh bone), in order to reach the hip joint. The detached muscles must then be reattached after the new joint is in place. Because the entry point is in the rear (literally!), this is called posterior hip replacement.
Contrast that with a newer surgical approach: anterior hip replacement, which is gaining popularity because it spares the muscles and allows quicker recovery time. This procedure is performed with the patient lying on his or her back on a specially designed surgical table. This position lets the surgeon access the joint from the front of the hip area without surgically detaching any muscles. Instead, the hip joint is reached through naturally occurring openings between the muscles.
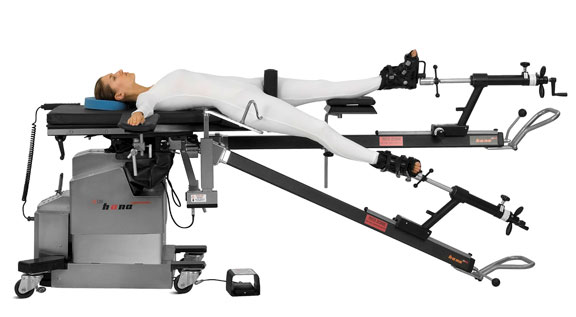 Photo of hana® Orthopedic Surgical Table is from mizuhosi.com, used with permission from the manufacturer (Mizuho OSI, Union City, CA)
As you can see from the above photo of positioning on the special table used for the anterior approach, the hip is placed in extension (drawn backward toward the floor in this case), abduction (spread away from midline), and external rotation (rotated away from midline) for the procedure.
What do surgeons say?
Clearly there are some major differences in this new technique, requiring us as yoga teachers to change our instructions to keep these students safe. Of course, the best source of information comes from having your student ask the surgeon who performed the operation about restrictions that should be followed.
Or is it?
Well, I decided to give it a try: I emailed 16 orthopedic surgeons in California who advertise that they perform the anterior hip replacement surgery to find out what they recommend for those practicing yoga after this new procedure. Here is what I wrote to the surgeons:
Hello,
I am an avid yoga practitioner and teacher. I know that with the posterior approach to hip replacement there are movement restrictions to protect the hip from dislocating such as no adduction, and no flexion past 90 degrees. This limits a number of yoga poses such as forward bends and leg-crossing positions.
Would an anterior approach allow a yoga practitioner more freedom to practice after surgery?
Please enlighten me about the post op restrictions in movement to avoid dislocation if one has hip replacement using the anterior approach.
Thank you so much!
I heard back from nine of the 16 surgeons — quite a remarkable response rate, I thought, considering how busy these people usually are. And I recommend trying email when you need to communicate with physicians.
Three of those who responded said there are no restrictions whatsoever with anterior hip replacement, even for people doing yoga. One surgeon said:
No hip precautions usually required. My patients who practice Yoga and dance have been able to return to those activities. The only dangerous position might be extreme extension and external rotation of the hip. I hope this clarifies matters.
Wishing you remembered your planes of movement anatomy class? Let me help: When doing a lunge like in Surya Namaskar or Virabhadrasana I, the back leg’s hip joint is in extension. Rajakapotasana (Royal Pigeon Pose) would be another example of hip extension. External rotation happens in the “front” hip in Virabhadrasana II, as well as every time we say “turn out from the hip” (e.g., Trikonasana, non-standing leg in Vrikasana, the leg with the bent knee in Janushirasana).
Two doctors told me that it is the modern “large head” technology used these days that makes hip replacements as stable as natural hip joints (referring to the artificial head of the femur that is implanted). One of these offered that the only restriction he recommended was to avoid repeated impact activities like running.
A surgeon from University of California, Davis who has done both the anterior and posterior approach surgeries said:
The tensor fascia latae can be damaged quite easily with the anterior approach; there is also some detachment of the rectus femoris muscle which attaches onto the anterior capsule of the hip joint. The recovery time in my experience and at our hospital has not been any better with the anterior approach. Restrictions are a subjective factor, meaning that anyone can tell the patient that they don’t have restrictions … that does not mean that it is any safer. I would give every hip replacement, regardless of approach, restrictions for 6 weeks until they can form adequate scar and healing of the tissues to avoid dislocation.
Another surgeon took a bit of time to explain:
I switched to anterior hip replacement almost three years ago after doing posterior and lateral approaches for over 25 years. The major factors which influenced this decision were improved stability and quicker return to normal activity, due mainly to the surgical approach which does not require cutting any muscles or tendons, and the ability to use a fluoroscope during the operation to guide alignment of the prosthetic components and adjust leg lengths and hip offset with much greater precision than is possible with the posterior and lateral surgical approaches.
After doing the first several procedures, my partner and I found that patients also had significantly less pain and limp. I have done around 100 of these operations and have not yet had a patient suffer a postoperative hip dislocation, and the West Coast “guru” of the anterior hip replacement, Dr. Joel Matta, tells his patients that they are allowed to place their hip in “any position that is comfortable.”
When I spoke to him over a year ago, he told me that out of over 2000 patients on whom he had performed an anterior hip replacement, only three had dislocated (usually from a bad fall), and all had been relocated by manipulation and had not dislocated again.
That being said, I don’t have any patients who are avid yoga practitioners, so I cannot offer any firsthand experience with the clinical situation you inquired about. However, it seems logical that a surgical approach which does not disturb the muscle support of the hip would be much more likely to permit a return to yoga activities with minimal to no restrictions compared to an approach which does disturb these structures.
Clearly many surgeons don’t know much about yoga!
I tried sending some photos of poses that put the hip in some extreme range of motion: Rajakapotasana, Dhanurasana (Bow Pose), etc. Interestingly — and unfortunately — none ventured to comment as to whether or not these poses would be considered safe.
One surgeon, however, gave a moderate response that made sense to me:
While anterior approach total hip surgery gives the patient greater post-operative flexibility than traditional posterior approach, most patients find that there remain some limitations compared to a “normal hip.” Patients typically do not have bending limitation but do often have some extension limits which may not be observed in normal or even athletic activity, but which may be perceived with some yoga positions. Patients may still practice yoga, but should just recognize that some limitation may exist.
What does this mean for yoga teachers?
So here’s the big question: What does this mean for you when working with a student who has had a hip replacement?
Proper exercise after surgery can reduce stiffness and increase flexibility and muscle strength, so yoga is a good thing for this condition. But how much and how soon are dependent on many factors such as physical health before the surgery and presence of chronic conditions that may affect the speed of healing. In the past this surgery was reserved mostly for older patients, as artificial hips didn’t last as long as they do now, and having a repeat hip replacement is possible but not desirable. But as technology has improved, so has the number of years the prosthetic parts can be relied upon to serve their purpose. So now it is more common to see hip replacements in younger people, who may be in better overall physical condition and who will heal faster.
So what restrictions should students with total hip replacement (THR) follow and for how long? The answer is, it depends. The goal is to avoid disturbing the healing process after surgery, and once healed, to preserve the function and integrity of the artificial joint for as many years as possible. Total rehabilitation after surgery will take at least six months for most people.
So when a student tells you they have a hip replacement, first, ask how long ago the surgery was, and whether their procedure was the anterior or posterior approach.
It is always advisable to get a doctor’s consent, especially if the surgery was recent (less than a year ago). To facilitate this, give the student a handout with pictures or drawings of the poses you teach, and ask him/her to show it to the doctor, who (one hopes) will be willing to circle the poses that should be avoided.
It’s always best to be conservative, even if you can get a doctor’s guidance, since doctor’s don’t always understand what’s going on with yoga practice. Here are some conservative general guidelines:
Traditional posterior approach
- No adduction (crossing the affected leg past the midline of the body) for 3 months, and limited adduction for another 3 months after that.
- No internal rotation for 3 months, and limited internal rotation for another 3 months after that.
- No flexion past 90 degrees for 6 months, and limited flexion past 90 degrees for another 6 months after that.
Any of those movements could put the hip at risk for dislocation, since the muscles they stretch are precisely the muscles that may have been compromised by the surgery. Because the artificial ball and socket are smaller than the “natural” ones, the ball can become dislodged from the socket if the artificial hip is placed in certain positions. In most cases, the most dangerous position after posterior THR is pulling the knee up to the chest — even if the person is simply lying down on his or her back, with no weight on the flexed hip joint. Balasana, then, is even more risky, because it puts substantial weight on the joint.
So help your THR student modify poses like Garudasana (Eagle Pose — avoid adduction), Virabhadrasana II (Warrior II Pose — don’t internally rotate the “back” leg, which, for the sake of knee alignment, means the “front” leg shouldn’t be rotated open a full 90 degrees), and Balasana (Child Pose — stay upright and rest the head on the crossed arms on a chair seat). Even forward bends like Padahastasana (standing) and Janushirasana (seated) can take the hip past 90 degrees of flexion, so you may have to tell the hip replacement student to back off the flexion a bit.
Anterior approach
The conservative cautions are opposite to those for the posterior approach:
- Limited abduction (separating legs at wide angle) for 6 months.
- Limited external rotation (turning thighs out) for 6 months.
- Limited extension (stretching backward) of the hip joint for one year.
Any of those movements could put the hip at risk for dislocation, or at the very least disturb the healing process, especially during the first few months after surgery. Even though no muscles are detached or compromised while replacing a hip joint, there are definitely some incisions being made that affect other support structures: e.g., ligaments and the joint capsule. So major modifications are in order for poses like Virabhadrasana II (which involves abduction and external rotation) and Rajakapotasana (back leg’s hip joint is in extension) for the affected hip.
Where do we go from here?
The guidelines I’ve shared above are conservative, but there may be times when you need to be even more conservative. For example, if your THR student is elderly and frail, and hasn’t been good about doing the recommended post-operative physical therapy exercises, you should be even more careful, and for a longer period of time, after the surgery.
Nevertheless, done with care, regular yoga practice can help any THR student build strength in the muscles around the hip to give the new joint maximum stability. Standing poses are great for this, especially one-legged balance poses, as we consciously engage the standing leg’s hip muscles and lengthen up through that hip. Setu Bandhasana (Bridge Pose), for example, can help those with posterior approach to strengthen the hamstrings and buttocks to resist flexion. On the other hand, poses such as Navasana (Boat Pose) are good for anterior approach because they strengthen the hip flexors. The Energization Exercises’ isometric contraction of the muscles around the hip are similar to some of the recommended post-operative physical therapy exercises for hip replacements.
No matter which type of surgery your student had, even when enough time has passed since the surgery that the cautions have been lifted, proceed carefully, as there still is a risk for dislocation, albeit to a lesser extent. As a teacher, it is best to encourage these students to protect the affected hip by not taking it to extreme range of motion in any direction.
For example, one man who had a posterior hip replacement procedure dislocated his new hip while in a lunge position, with the back leg having had the hip replacement. That shouldn’t happen, right? Extension should be a risk only for anterior replacement, right? Well, that’s the theory, but in fact something else happened. We can only assume that he was taking his new hip into too extreme a position.
One aid can be to remind your students that going deeper into a stretch is not as important as going deeper into the experience of the awakened energy. Having them focus on the inward experience of Ananda Yoga can relieve the temptation to push beyond where an artificial hip joint was meant to go.
These students should also be advised to avoid the repetitive impact of running to preserve the integrity of the prosthetic parts even after the surgical site is healed. So after walking in place during Energization Exercises, have them keep walking rather than going on to the usual running-in-place exercise.
Yoga teachers are not medical practitioners (unless we have that training), but the more we educate ourselves about common procedures such as hip replacements, the better prepared we will be to keep our students safe in class. A dislocated hip is a painful medical emergency for the individual, not to mention a hugely disruptive event amid the otherwise-peaceful atmosphere of your yoga class. Knowing the specifics about hip surgery will help you to understand and remember why students with THR need our help in finding appropriate modifications for many yoga poses.
However, a knowledgeable Ananda Yoga teacher can go beyond merely protecting the THR student from doing harm to his or her compromised hip during yoga class: We can offer effective therapeutic aids to healing and greater functionality. Prominent among these are the Energization Exercises of Paramhansa Yogananda, and the standard Ananda Yoga practice of focusing on the flow of prana while doing appropriately modified yoga postures. After all, the primary ingredient in healing is the energy (life-force, prana) from which all body cells are made. So by training your students to perceive, increase, and control the life-force via Ananda Yoga, you are preparing THR students to stimulate the flow of life force to the affected hip, and thus speed their journey back to strong and healthy hips.


4 Comments
Thank you so much. This is the most detailed and clear information I have found on the subject.
I have new fake hipthree months ago
I miss yoga so much
Scared of what to not do
Going to try and see if you have anything in print
Thank you so much…I am 70…feel lost/incomplete wo yoga in my life
Hello, Nick. Thanks for speaking up. So sorry for your difficulties. From this article, it looks like a number of specified poses would be safe and beneficial for you. Melody Hansen is reaching out to you to see about addressing your individual questions and even suggest connecting for a remote yoga therapy session. Blessings!
I feel your pain….I too live for my daily yoga practice and about to have hip replacement. I guess we now have to practice patience and the reality of impermanence.
Namaste my friend 🙏